Pages

Thursday, September 6, 2012

Last But Not Least

Believe it or not, I still had peaches left over after making freezer jam, two cobblers, and several smoothies!  With only a small window of life left in them, they needed to be used fast.  I didn't quite have enough to make more jam or cobbler, so I bread it was!  Just imagine peach muffins in bread form with just a touch of cinnamon.   

Peach Bread

1/2 cup butter softened 
1 cup sugar
3 eggs
2 3/4 cups flour
1 1/2 teaspoons baking powder
1/2 teaspoon baking soda
1 teaspoon salt
1 1/2 teaspoons ground cinnamon 
2 cups sliced fresh peaches 
3 tablespoons frozen orange juice concentrate, thawed 
1 teaspoon vanilla

Cream butter; gradually add sugar, mixing well.  Add eggs, one at a time, beating well after each addition.  Mix together dry ingredients in separate bowl; add to creamed mixture alternately with the peaches, beginning and ending with flour mixture.  Stir in orange juice concentrate and vanilla.  Pour batter into two greased and floured 8 1/2 x 4 1/2 x 2 1/2 pans.  


Bake at 350 degrees for 50 minutes or until wooden pick inserted in center comes out clean.  Cool in pan 10 minutes.  


Remove from loafpan and cool completely.  Or eat warm.  :-) 


Tuesday, September 4, 2012

A Lot of Peaches

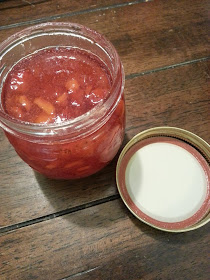
Every time I think about peaches, the song Peaches by Presidents of the United States of America gets stuck in my head.  And as of late, it seems to have taken permanent residence up there with all the peaches I've been using!  Just in case you aren't sick of peaches yet, I found the perfect recipe for strawberry peach freezer jam at Taste of Home that I have to share (with a little tweaking of my own).  I love strawberries and I love peaches, and I love the two of them together even more! 

Strawberry Peach Freezer Jam
 
2 cups chopped fresh strawberries 
1 1/2 cups chopped peeled peaches 
1 tsp lemon juice
1 package (1-3/4 ounces) powdered fruit pectin
5 cups sugar

In a large saucepan, combine the strawberries, peaches, lemon juice, and pectin. Cook and stir on medium high until mixture comes to a full rolling boil. 


 Stir in sugar; return to a full rolling boil. Boil and stir for 1 minute. Remove from the heat.  Pour into jars or freezer containers. Cool to room temperature, about 1 hour. 


Cover and let stand overnight or until set, but not longer than 24 hours. 


Refrigerate for up to 3 weeks or freeze for up to 1 year.  Makes about 6 cups.

Sunday, September 2, 2012

My Kind of Sale

I live for sales.  It's the only way to shop.  And this sale is a sale worth talking about.  For any of you Forever XXI lovers out there, they're having a huge Labor Day sale this weekend.  All of their clearance markdowns are buy one get one free.  Yes, you read that correctly.  Buy one get one free.  Most of their clearance items are already marked around $3.99 to $9.99, so when combined with the promotion going on, you can get items for as little as $1.99!   Little Miss M is getting to where she can fit into junior sized clothing, so we always check out the sales racks for her.  We were able to grab up two dresses and two tanks for less than $10!  Now that's a steal of a deal if you ask me!  If you weren't able to get all of your school shopping done, now is the time.  I know several other stores have amazing sales going on right now for the holiday (Gap is taking an extra 25% off baby and kids clearance items), but this is the best I've seen yet.   


Dresses that would be hoochie moma short on me, are the perfect length for the Little Miss!
 

Southern Style

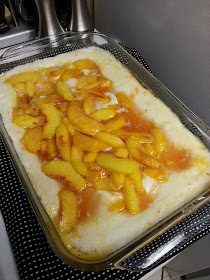
Besides all the jars of beautiful canned peaches I got sent home with from Auntie C's last night, I got a whole basket full of fresh peaches!  What better way to use fresh peaches than to make a good ole' Southern cobbler?!  I think it's funny how people out here make cobbler.  They put the fruit on the bottom and plop some batter on top.  Cobbler isn't cobbler without a buttery crust around the edges and you don't get that by plopping batter on the fruit.  Moma taught me that to make a good cobbler, you melt the butter in the pan and pour the batter over the top.  Then you put the fruit on top and the batter envelopes the fruit as it cooks.  That is how it's done folks.

Southern Peach Cobbler

1/2 cup unsalted butter 
1 cup all-purpose flour 
2 cups sugar, divided 
1 tablespoon baking powder 
Pinch of salt 
1/2 cup milk 
1/2 cup buttermilk
4 cups fresh peach slices 
1 tablespoon lemon juice
  
Preheat oven to 375.  Melt butter in a 13- x 9-inch baking dish in oven as it preheats.  Combine flour, 1 cup sugar, baking powder, and salt.  Add milk, stirring just until dry ingredients are moistened. Pour batter over butter (Do not stir!!!).  The melted butter heats the batter enough that it spreads out on its own. 


Bring remaining 1 cup sugar, peach slices, and lemon juice to a boil over high heat, stirring constantly.


Pour over batter (Do not stir!!!) 


 Bake at 375° for 40 to 45 minutes or until golden brown. 


Best served warm with whipped cream or vanilla ice cream.


Peaches

Ever wish you'd paid closer attention to something when you were younger?  For me it was my Moma when she was canning.  I was too busy whining and complaining about having to peel and cut the fruits and vegetables to pay a lick of attention to what she did with them.  Oh do I regret it now. 

While the Mister is away with his boyfriends buddies on their Fantasy Football Draft trip, I'm being domestic.  Last night I was introduced to the art of canning peaches thanks to the Mister's Auntie C.  Canning is so much better as an adult than I remember it being as a kid!  Now I want to go out and buy a bazillion jars and start canning everything under the sun!  I feel so accomplished!  I hope Auntie C doesn't mind my sharing her mom's recipe for canned peaches.  Pay attention to her dad's notes at the bottom.  You'll need them.  And enjoy the pear and grape juice recipes while you're at it!


We used a steam canning system but I'm curious to try it using a water bath and/or a pressure cooker now!


They're almost too pretty to eat.  Almost.  :-)

Friday, August 31, 2012

The Shirt Skirt

When there's an eight and a half year age difference between your girls, it's hard to justify saving Little Miss M's clothes until Baby P can fit into them.  That's a lot of boxes to be lugging around!  I'm a sucker for cute girl clothes and Little Miss M is definitely not lacking in the clothing department.  It's really hard to part when some of her clothes when she grows out of them.  It's almost as though I've become emotionally attached to them.  So instead of just getting rid of all of the old clothes, I decided to start re-purposing them into Baby P clothes.  It's so much cheaper than buying the fabric or buying new clothes and it makes hand-me-downs not seem to hand-me-downish.

I loved the polka-dot fabric on this shirt and couldn't bear to part with it just yet, so I turned it into a skirt for the wee one.  The only supplies needed are a shirt, thread in a coordinating color, and a piece of elastic for the waistband.  This could honestly be done with any shirt.  Adult t-shirts would be perfect for making knit maxi skirts for the little ones!  Maybe that will be my next project!


Cut across shirt from bottom of left arm-pit to bottom of right arm-pit, using a ruler as your guide to ensure a straight line.  I used my rotary cutter for a quick and straight cut.  Depending on how large the shirt is, you may want to cut it further below the arm pits so that it doesn't drown the wee one.


Turn "skirt" inside out.  Fold raw edge over 1/4 of an inch, then fold over again 1 inch to 1 1/2 inches, depending on the size of elastic you will be using.  Make sure that you are pinning as you fold to keep it in place until you begin sewing.  Place foot against left side of double folded fabric and sew around waist.


Make sure to leave about an opening about an inch wide at the end so that you can feed elastic into waistband.  I just measured the waist in one of Baby P's other skirts to get the elastic length.  Using a safety pin or whatever floats your boat, feed elastic through entire waistband, making sure you don't let other end slip through.  Stitch the two elastic ends together, going over several times to make sure it won't come apart.  Stitch opening in waistband shut.   


And there you have it!  I think it probably took less than fifteen minutes from start to finish.  It was that simple!


Brown Bananas

Am I the only person that gets excited when the bananas start turning brown because it means I'll soon have an excuse to make banana bread?  I'm not a very patient person when it comes to my food, and I especially hate waiting for the bananas to get ripe enough to make banana bread!  I've been known to buy already browning bananas from the store to get a head start!  Growing up one of my favorite things to eat was my Moma's banana bread, hot out of the oven with peanut butter on top.  This little number is an ode to my childhood days and the goodness of peanut butter, chocolate, and bananas.  Be warned that you may find yourself having eaten an entire loaf without even noticing.  Happens to me all the time!

Peanut Buttery Chocolate Banana Nut Bread

1 1/4 cups sugar
1/2 cup butter or margarine, softened (I just stick it in the microwave for 15 seconds)
2  eggs
1 1/2  cups mashed very ripe bananas (3 to 4 medium)
1/2 cup buttermilk
1  teaspoon vanilla
2 1/2 cups all-purpose flour
1 teaspoon baking soda
1 teaspoon salt
3/4  cup walnut halves and pieces
3/4 cup peanut butter chips
3/4 cup chocolate chips

Move oven rack to low position so that tops of pans will be in center of oven. Heat oven to 350°F.  Grease 2 loaf pans, 8 1/2 x 4 1/2 x 2 1/2 inches.  Mix sugar and butter in large bowl. Stir in eggs until well blended.  Add bananas, buttermilk and vanilla.  Beat until smooth.  Stir in flour, baking soda, and salt just until moistened. Stir in nuts and chips.  Pour into pans and bake about 55 minutes or until toothpick inserted in center comes out clean.  Cool 10 minutes.  Loosen sides of loaves from pans; remove from pans and place top side up on wire rack.  


Eat!  I guess you're supposed to let it cool all the way before you cut the knife into it, but I'm too impatient for that mess and I like it still warm!


Wednesday, August 29, 2012

Spaghetti, Squash, and Cheerios

I saw this idea on Pinterest a couple of days ago and wanted to try with Baby P that supposedly helps with fine motor skills.  Truth be told I didn't follow the link, just looked at the picture and thought it looked like a good idea.  So who knows what it's really supposed to help with!  Regardless, I took some spaghetti and stuck it into a piece of squash.  Then gave her a bowl of cheerios. 


The idea is to have them put the cheerios onto the pieces of spaghetti.  It sounded good in theory, but was lacking in execution.  Instead of Baby P putting the cheerios on the spaghetti, Mommy was putting cheerios on the spaghetti and Baby P was taking them off to eat. 


Until Baby P decided she'd rather pull out all of the pieces of spaghetti and eat the squash.  At least it kept her entertained, or maybe I'm just not feeding her enough!

Ravioli Surprise

I'm notorious for buying food at the store because it sounds good, only to get home, stick it in the fridge, and forget about it until after it's already gone bad.  Well not this time my friends, not this time!  I had some refrigerated ravioli that I needed/wanted to use, so I came up with this little number for dinner tonight.  And you know it's good when the Little Miss goes back for seconds!

Ravioli Soup

2 tbsp olive oil
3 cloves garlic, minced
one small onion chopped
4 cups chicken broth
1 14.5 oz can petite diced tomatoes (don't drain them!)
1 8 oz can tomato sauce
1 small yellow squash sliced and quartered
1 small zucchini sliced and quartered
1 can white beans, drained 
1 to 2 tsp italian seasoning
1/4 tsp black pepper
Pinch of oregano
Pinch of basil 
Pinch of thyme
9 oz package refrigerated ravioli
grated parmesan cheese

Heat olive oil on medium in large saucepan.  Saute garlic and onion until translucent.  Usually takes about five minutes.  Add remaining ingredients except ravioli and cheese and bring to a boil over medium high heat.  Once it comes to a boil, cover, reduce heat, and simmer for 20 minutes.  Return heat to medium, add ravioli, and cook for an additional 7-8 minutes.  


Serve with grated parmesan cheese sprinkled generously on top. 


Monday, August 27, 2012

Sour Melon

You may or may not be aware, but I hate watermelon.  Melon of any sort actually.  And loathe would be a better word.  I think it's a combination of the flavor and texture.  But when the flavor is masked by other, more powerful flavors, I can handle it.  And that is just the case with Watermelon Lemonade.  I was surprised by how much I liked the stuff.  It's a great way to get rid of extra watermelon and the kids and misters will love it! 

Watermelon Lemonade
1/2 cup white sugar 
1/2 cup water
4 cups cubed watermelon
4 cups cold water
1/2 cup fresh lemon juice

Place the watermelon into a blender. Cover, and puree until smooth. Strain through a fine mesh sieve.  Bring sugar and 1/2 cup water to a boil in a saucepan over medium-high heat until sugar dissolves, about 5 minutes. Remove from heat.  Stir in 4 cups of cold water and the lemon juice.  Add watermelon puree, mixing well.  Chill or serve over ice.


The original recipe came from allrecipes.com.  I just made a couple of tweaks.

Anchors Away

I'm obsessed with all things of the nautical nature as of late.  And I found THE perfect anchor template this last week at Craft Ideas


It seriously could not be more perfect.  And it's free!  I love how thick the border is, making it super easy to trace through fabric.  


Little Miss M had this white shirt with a big black stain right smack dab in the middle of the chest area that was just begging to be covered.  What better way than to slap a big anchor right over that stain! 


An old stained shirt, left-over fabric from the polka-dot skirt, iron-on transfer adhesive from an old project, black thread, and a gold button I took from Moma's collection last time I was home put the cost at zero out of pocket.  After adhering the anchor to the shirt I hand-stitched it down with some black thread to make sure it stays put and add to the nauticalness.  (I love making up words.)  All in all it took less than forty-five minutes from start to finish and it looks as good as new! 

My mind is literally racing with ideas for uses of this anchor template.  The possibilities are endless!  I used it to make this pillow sham a couple of days ago for the Little Miss and Baby P's room.  

  
The only problem is that I can't decide whether I like the front or the back better!


Sunday, August 26, 2012

My Obsession

I've said it before, and I'll say it again.  I love ShoeMint As a recap, ShoeMint is an online "members-only" shoe shop.  You create a your own personal style profile with a fun little quiz, then receive access to monthly showrooms of exclusive designs of shoes hand-picked just for you.  You can either order the pair or pairs you want or skip the month for free.  To top it off, you get free shipping both ways!  And free shipping is one of those non-negotiables for me.  I also get weekly emails with special promos for gift with purchases and discount codes.

To make this already wonderful site even more wonderful, ShoeMint has just introduced a reward program for members.  You can now earn points with every purchase to redeem for free credits and discounts to shop on any of the "Mint" sites.  Right now when you join, ShoeMint will send also you a one-time code for 50% of your first purchase!  That's a steal of a deal.  Especially when you consider the supreme quality of the shoes.  If you're interested in joining or just curious to learn more about them, follow this link.  Below are a couple of my latest ShoeMint faves.  Did I mention they now carry handbags?  Have fun!


The Carry All Tote is the perfect way to add a little on-trend neon into your daily wardrobe without going overboard.  It even came with its own storage bag!


The Melissa Bootie is the perfect transition boot that will take you from summer to fall.  And it is oh so comfortable!


The Little Miss is getting quite good at taking pictures for me.  :-)


Polka Dots and Pleats

While this may seem trivial to some, I'm proud to say that I was able to get up and get the Little Miss to school on time every day last week!  This is quite an accomplishment for me.  Looking back I realize how much of a struggle it must have been for Moma to try and get me to wake up every morning.  Thankfully, Little Miss M wakes up and gets ready on her own with a little thing called an alarm!  I guess those things just never really worked for me.  Thank you Moma for waking me up all those years and not strangling me out of frustration!  Well between getting up early and the Little Miss back in school, I have so much extra time to get things done!  I even pulled out the old sewing machine this week!  

For Baby P's first birthday I bought an adorable little skirt from DownEast (which I paid about double or triple what I usually pay for her clothes.)  Upon further inspection I realized how easy it would be to make one myself.  I had some elastic leftover from an old project and found an adorable polka dot fabric remnant from Walmart for less than $2.  I could have made ten skirts at this price for the price of the one I got at DownEast!  It took less than an hour to come together and turned out fabulous!  Next time I whip one up, I'll make up a pattern/put together instructions to share.


This is the skirt purchased from DownEast (and one of my absolute favorite pictures of Baby P).  Although you can't see it in the picture, there is a thick elastic waistband.  My favorite part of the skirt has to be the pleats at the hemline.


 This is my version of the skirt, complete with modeling from Baby P.  The pleats were so easy to replicate!  Maybe I will make ten more!  


She's starting quite young with the poses!!

Roommates

A couple of months back we stumbled upon a liquidation store in Lehi that has obscene deals on anything you can think of.  Linens, kitchen appliances, clothing, electronics, furniture...  You name it, they've got it.  They're only open on Fridays and Saturdays from 10-3, but if you have time and are in the area, GO!!  Sorry this is sounding like a commercial!  Well, earlier this summer, Tom the owner (yes, we're on a first name basis) told us he'd be getting some cribs in.  I started describing THE crib I've been drooling over for months only to find out that he was getting it in!  Keeping in mind that this particular crib goes for anywhere from $175 to $275, we were able to snatch the beauty up for a mere $94!  SOLD to the lady with the sock bun and leopard print shoes!  Side note:  Baby P has been sleeping in a playpen in our room for the last year, and we figured it was high time she move in with her big sister.

We made this beauty of a purchase while the Little Miss was visiting her folks back in the Carolinas for the summer.  Unbeknownst to her, she'd be getting a new roomie when she came home!  As if getting a new roommate isn't surprise enough, I decided to give the room an overhaul.  The old decor wasn't awful, just wasn't really big girlish.  I found the perfect paint color from Benjamin Moore called Robin's Nest.  Surprisingly it only took a couple of hours to paint the whole room, and the color turned out beautifully!

I pulled out all the old linens and took out the drapes, leaving behind the white sheers.  Besides paint, the only new things I purchased were a set of white sheets for less than $10 from Walmart, the white ceramic owl "piggie" bank from Soel Boutique in Provo for $14, and the blue ceramic bowl for $2.99 from TJMaxx.  The pillows and comforter were all things we already had around the house.  The Mister's Auntie C contributed the mesh tiered wire stand on the dresser, along with a mirror that has yet to be painted and hung.  The seashells, starfish, and sand dollar are all ones the Little Miss has collected over the years.  It's a huge work in progress, but so far I'm loving the results!  And you wouldn't believe the pure joy and excitement on Little Miss M's face when she came home to a "new" room and roommate!


Thankfully they made it through their first night as roommates and still loved each other in the morning!


More pictures to come when the room is more presentable!